Tips On Pouring Your Own Concrete Driveway
If it’s come time for you to lay a new driveway at your home you have several options to consider you can make it gravel, or asphalt, or pour concrete. Of course gravel needs yearly maintenance, will grow weeds, and eventually needs to be refilled as rocks dissipate in many different ways. Asphalt is much better but still needs maintenance due to the oils eventually drying out in the hot sun. Concrete, on the other hand, if done right, can last nearly a lifetime. Although it may seem like pouring your own driveway is a monumental task, it’s not as hard as it seems let’s take a look at some tips to help get you started.
Preparation Is The Key To A Well Poured Driveway
Define the area that you’re going to fill with concrete and excavate it down about 4 inches and put in your forms. Then, make sure that the soil is well packed down. You don’t want any open spaces due to settling underneath your slab since that might lead to cracks. If the soil is soft, dig down deeper and fill in with gravel and sand to make a solid base. You can rent a soil compactor at your local rental yard to further pound the ground until it’s solid.
Talk to the local concrete delivery company and get the facts on what kinds of mixes they sell. Tell them exactly what you’re using it for and then order the concrete at normally about 90 slumps. The slump is an indication of how much water is in the mix and the higher the number the more water. Make sure that you have plenty of tools at the ready, and get as many people to help you as possible. You should find several that have had experience doing a pour as they are invaluable. If you’ve never done one, offer to help someone else do theirs to gain valuable knowledge and confidence.
It Costs A Little More But Steel Reinforcements Are Worth It
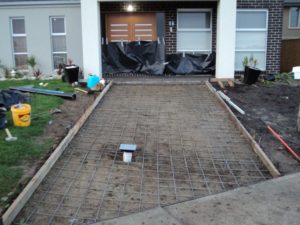
If you’re not ever going to have heavy trucks using your driveway you don’t need any reinforcing. But if you are, it’s well worth the effort and extra cost. You can get 1/2 inch steel bars and lay them into a grid pattern with 2 foot spacing. The entire grid should be raised above the ground level by setting it up on rocks. That way the concrete will fill over and under it so that it is embedded into the center.

100mm thickness is best for a driveway, but if you can afford the extra cost, go for 5 inches instead. It will be far stronger, never crack, and you won’t ever have to worry about heavy vehicles driving on your concrete. You should water everything down before the concrete arrives so that dry soil doesn’t extract water from your concrete. That would weaken it since it needs to set in the presence of moisture to become firm and strong.
Once everything is ready, make sure you have plenty of help on hand for when the concrete truck arrives. Have a cleared area for the truck to get as close as possible and plenty of wheelbarrows to cart the concrete to its final destination. Once the forms are all filled, you’ll need to screed it with long 2 X 4s so that it is level to the top of your forms all the way around and the larger rocks are forced down with a finishable surface on top.
The finish work should be left to someone with experience since that’s what everyone will see when your project is done. It needs to be spread with floats and then broomed to leave a nice pattern on the surface. There are lots of videos available online to show you exactly how to make your concrete pad look the way you desire.


